Classroom Strategies, Technology

Creating a Class Learning Journey with Slides

Each May, our science department hosts Science Night. It has been a lot of fun to involve our school, local high schools, and community in science! Many students bring their families, and participate in labs and activities together. Additionally, we invite local museums and science organizations to set up interactive displays. I love science night!

Science Night in my classroom. Students, teachers, and families are checking out the displays and learning from student presenters. 

Since most of the work we do is digital, there isn’t a ton of student work to physically display. Instead, we display interactive labs. To show off student work, I have them each create a slide in a collaborative deck to showcase their work. Then, this is projected as a slideshow all night.

This is a perfect way to have students reflect on their learning or on a particular assignment. Each student claims a slide, adds in a piece of work they are proud of, and reflects on it.

Here is a template you can try with your class! Duplicate the portfolio slide x # of kids in your class.

A few tips for getting started:

  • This is a perfect time to talk about digital citizenship, especially not intentionally editing someone else’s slide. No matter the age level, everyone needs this reminder.
  • Encourage students to get all the content on their slide first, before decorating. Otherwise, a student may spend 2 hours finding the perfect font for their name.
  • Do a virtual gallery walk! Play some music, and have students scroll through the slides. When the music stops, they add in a comment (try using TAG feedback!) where they stopped.

If you have a school or class open house or display night, play these reflection slides in the background. On Slides: File > Publish to the web > pick your settings, including “restart slideshow after the last slide” > publish > paste the link in the address bar. 

MVA Science Night 2017-2018
One student’s slide from our collaborative science night slide deck!

Try using this same idea for an introduction slide deck for all your students! Replace the work section with a selfie, and answer a few basic questions, such as what are your hobbies?

Out of the classroom? I’ve seen schools/districts with a tv in the front office. Have each teacher create a spotlight slide to sprinkle between announcements and important information.

PS. When you iterate on this and make it better, I’d love to see your example! Add it in the comments below, or share it with me and I’ll link it in this post.

Classroom Strategies, GSuite, Technology

Peer Feedback with Forms

Class presentations are a lot of fun, and it’s essential to give students the experience of speaking in front of others. Very early on in my teaching career, I realized it was difficult to keep presentations flowing, because in the transition time between presenters, students saw this as an opportunity to chat–and they had a tough time settling down again. Repeat this 30+ times, and we have one frustrated Ms. V.

Around the same time I decided to have students start to provide peer feedback for student presentations. They would fill out a Google Form (here’s an example or make a copy) after each presenter. Yes, after. I expect their iPads “apple up” on their desks while their peer is presenting, both as a sign of respect and to eliminate other distractions.

TAG Feedback template

Unintended results! Off-task behavior between presentations was almost nonexistent! Students had something meaningful to do between the time it took for the presenter to sit down, and then next student to get up and connect their iPad.

One of the things I’m working on with students is how to write feedback. I’m realizing that I need to provide more sentence frames to help students share what the student does well, and what they can do to improve. I’ve used TAG Feedback, and it has helped!

This peer evaluation form has been such a big hit, that now I’m tasked with creating copies for all our AVID teachers when we do presentation projects.

Below are some tricks I’ve made data analysis even easier!

Conditional Formatting
I use conditional formatting on Sheets to change the fill color for each rubric level. I can glance at the spreadsheet, and see overall how peers feel the presenter did.

Screenshot of student project feedback.

Form Values
Form Values is an incredible add-on for Forms. It creates a template spreadsheet where you can create lists that can then be imported into a Form for a multiple choice, checkbox, or dropdown question. I use this for my class lists, so I don’t have to constantly type in names into the “my name” and “presenter’s name” questions.

Screen Shot 2017-03-16 at 1.29.21 PM.png
Form Values add-on

RowCall
RowCall is an add-on for Sheets that takes all the unique values in a column, and creates individual sheets for each value. The way I use it is to separate each student presenter into their own tab. Then, I can quickly see how each student did, without having to sort or filter the main sheet. In the past, I’ve printed each student’s tab. Lately, I’ve asked students if they’re ok if I share the whole spreadsheet view only with all students (via Google Classroom), and I have not had any objections. They like seeing their own feedback, and also learning from how their peers were evaluated too.

Screen Shot 2017-03-16 at 1.30.31 PM.png
RowCall add-on

I’d love to hear how you use peer feedback in your classroom! 

GSuite

Fun with Google Slides

You may have noticed a pattern that I absolutely adore and love Google Forms and use them daily in my classroom. In the last year, I’ve discovered a deep admiration for Google Slides. Not only are Slides my go-to for projecting the warm-up questions, posting instructions during class, and direct instruction (sometimes I use screencastify to create in-class flip videos!), but also I’ve transitioned quite a few student assignments over to Slides.

We are 1:1 iPad, and the Google Slides iOS app is easy to use. It doesn’t have all the features of the web version, but it has just enough that we need on a regular basis.

Slides with Students
This year, I’ve transitioned all of my science labs to Slides. Instead of giving students a Google Doc to edit, or a PDF to work on in Notability, I’ve moved everything to Slides.

I love using Slides because it chunks down the lab into manageable parts. Instead of students staring at a long Google Doc, feeling overwhelmed at everything they are being asked to do, we can focus on one slide at a time. Bonus: I’ve noticed a positive difference in my students’ lab behavior–they are more on-task because they know exactly what they need to get done!

I was using Docs last year, and we had trouble when trying to insert pictures, especially in data tables. Students had trouble cropping images or making them easy to see. Slides is an excellent solution!

If we were on Chromebooks, I would extend this by using the Screencastify extension to have students explain what they did and what they learned in the lab.

Here’s an example of a Heart Rate Lab and Paper Airplane Lab we did using Slides. On the Heart Rate Lab, you can see I color-coded the different steps, making it easy for me to quickly check that we’re all on the same slide.

Slides for Teacher Creation
A few months ago, I blogged about Virtual Vikings, my #BathroomPD newsletter I create for the staff bathrooms at school. I change the page setup (File > Page Setup > Custom > 8.5 x 11) to make it printer paper size.

I use Slides to create handouts for class, including Cornell Notes (here’s my template!), I love how easy it is to add in and format text and images. It also makes it quick to print class handouts (I use analog interactive notebooks).

Master Slides
I’ve just started diving into master slides, thanks to inspiration from friends like Michele Osinski who is a pro! I’m still figuring it all out, but I love that I can customize my Slides templates to make it easy for specific layouts and formats. Here’s a quick video (I didn’t make this one) that explains more.

What are your favorite ways to use Slides?

Classroom Strategies

How to Structure Student Discussions with a Walk and Talk

This blog post was originally featured on Kids Discover on September 13, 2017.

You know those days when the kids are getting a little squirrelly? The days where the side conversations get the best of the quietest kids and even the smallest distraction gets us all off track? It’s time to get the wiggles out while being productive.

It’s time for a Walk and Talk!

I teach in San Diego, California, and the weather is generally pleasant outside. We can easily go outside for this activity. This also works inside around the perimeter of the classroom (you might need to push the desks toward the center) or quietly up and down the hallway.

A Walk and Talk is a structured partner discussion where students are given question cards to answer with a partner while walking on a specified path. They walk toward a set location, such as a pole or tree, then turn and walk back. You can incorporate an instructional assistant or parent volunteer into your class activity by setting them as the turnaround point.

Set-up
Start the class with a lab, activity, or guided reading assignment done in class. When I’m planning this activity ahead, I will create a list of questions or task cards, then pre-write them on index cards. The questions can be a combination of a review of what you’ve covered in class and how your students will prepare for the upcoming assessment or presentation.

When this activity happens on the fly because of extra time at the end of class or an energy surplus, I’ll ask students to write the questions on index cards themselves, based on what we’ve covered in class.

Before we go outside to our Walk and Talk location, I will randomly assign students a partner. Flippity Random Name Picker is my favorite randomizer tool. Then, we quickly review our class expectations for the Walk and Talk and for outside class work.

The Walk and Talk
We all walk outside and students line up next to their partner and I stand facing the head of the line. I hand a question card to each person in the first pair and wish them luck. The first person answers their question on the way to the turnaround point (about 20-30 steps), then they switch roles and the second person answers a question on the way back to the line. I wait about 10 steps between each pair, which helps prevent extra distractions.

Once the partners return from their walk, they get back into line. When they’re back to the front of the line, I switch their cards for new questions and we repeat the Walk and Talk. I quickly check in with each pair as they return and exchange cards, asking, “how did it go?”

Typically, we do three rounds before returning to class.

Debrief
When we go back inside, students take some time to share something they learned from their partner or found interesting. This happens either out loud, or as a quick-write on paper or as a question on Google Classroom.

The Walk and Talk is an excellent preparation or reflection tool for larger research projects, essays, and Socratic Seminars. My students love the opportunity to go outside and work, discuss with a partner, and move around.

GSuite

Daily Check-in With Google Forms

I love teaching middle school, especially 7th grade. The kids are goofy, energetic, and super squirrels (…squirrel!). They’re also pre-teens, and trying to fit into the limbo world where they’re not quite kids, but not quite teenagers. Many of my kids have faced challenging family situations that preoccupy their thoughts while in school.

Knowing things are sometimes distracting outside of class, whether it is friends, family, or both, I start my class with a warm-up. This is usually a silent individual activity that activates prior knowledge, or asks students to review what they learned last class.

In April 2015, I changed the way I did my warm-ups. And I had major positive results. Immediately.

I implemented the Daily Check-in Form. I still called it a warm-up, but the purpose expanded to ask students about their day.

Before we continue, please fill it out here.

Your warm-up questions are:

  1. Who do you teach?

  2. What made you interested in this blog post topic?

  3. How do you currently start your class periods, meetings, or workshops?

Ok, now that you filled it out, let’s continue. (If you didn’t fill it out, go back and do so. It’s good for you to actually go through the experience, not just open up the link!)

When students arrive for class, they line up in 2 silent, straight, and smiling lines outside. I invite them in, and they walk in silently (we don’t do it right, it’s back outside to do it over), and begin their warm-up on their iPad. I have a set of Slides for each lesson, and the first Slide is always the warm-up questions.

I reuse the same Form everyday and for all classes. At the end of the week, I hide the previous week’s rows on Sheets.

The three questions I ask my students to check in with them daily.
Three check-in questions with running averages.

I know some of you are asking, why are you SO strict on coming in silently? Two reasons: First, it helps my students settle in and make the transition to class time. Second, it helps me setting in and make the transition to teaching. I use that time to take attendance, quickly check in with individual students, and skim their warm-up answers.

From this daily warm-up, I have learned many essential things about my students, from death of family members or arguments with friends, to excitement over weekend plans or their deep love of tacos. These are things my students may have been too shy to tell me, or I likely would not have taken the time to listen to their needs.

I use conditional formatting to make it easier to skim how students are feeling. It's a color gradient where 1 is red, and 5 is green.
Screenshot of the Sheet. I use conditional formatting

to make it easier to skim how students are feeling.

If there’s a concern, I’ll pull the student aside during class and chat privately about what they shared. If they rank their day as a 1, then I’ll make sure I make it over to their desk more frequently, offer a friendly smile, and start a conversation. (I don’t take them aside, unless they show additional signs of being upset or stressed in class.)

The day I first implemented this warm-up, I learned that my student’s uncle died the week prior. Over the next three weeks, she lost three more people close to her. Because she willingly shared this with me, I was able to support her emotionally in class, and refer her to our counselors for additional support. I am 100% positive this prevented serious behaviors in my class, because she had struggled all year with attitude and off-task behavior.

When I present at conferences and workshops, I often start my session with an identical Form–I ask about participants’ prior knowledge on the topic and goals for the session. I feel like this helps me connect to my participants in the limited time we have.

I’m grateful for this simple tool that has helped me build community in my classroom!

Love this idea? Here’s the Form template.

Have fun with the Form, make it work for you, and please share!

Attribution-NonCommercial-ShareAlike [CC BY-NC-SA]
Attribution-NonCommercial-ShareAlike

[CC BY-NC-SA]

GSuite

Google Forms in My Classroom

We’ve established that I have an obsession with Google Forms. It’s easy to connect & manage data from students, parents, etc. Last week, I posted on how to use Google Forms for teacher walkthrough observations–targeted at either administrator walkthroughs or peer walkthroughs. This week, I’m going to share how I use Google Forms in my classroom and school.

Daily Check-ins & Warm-up

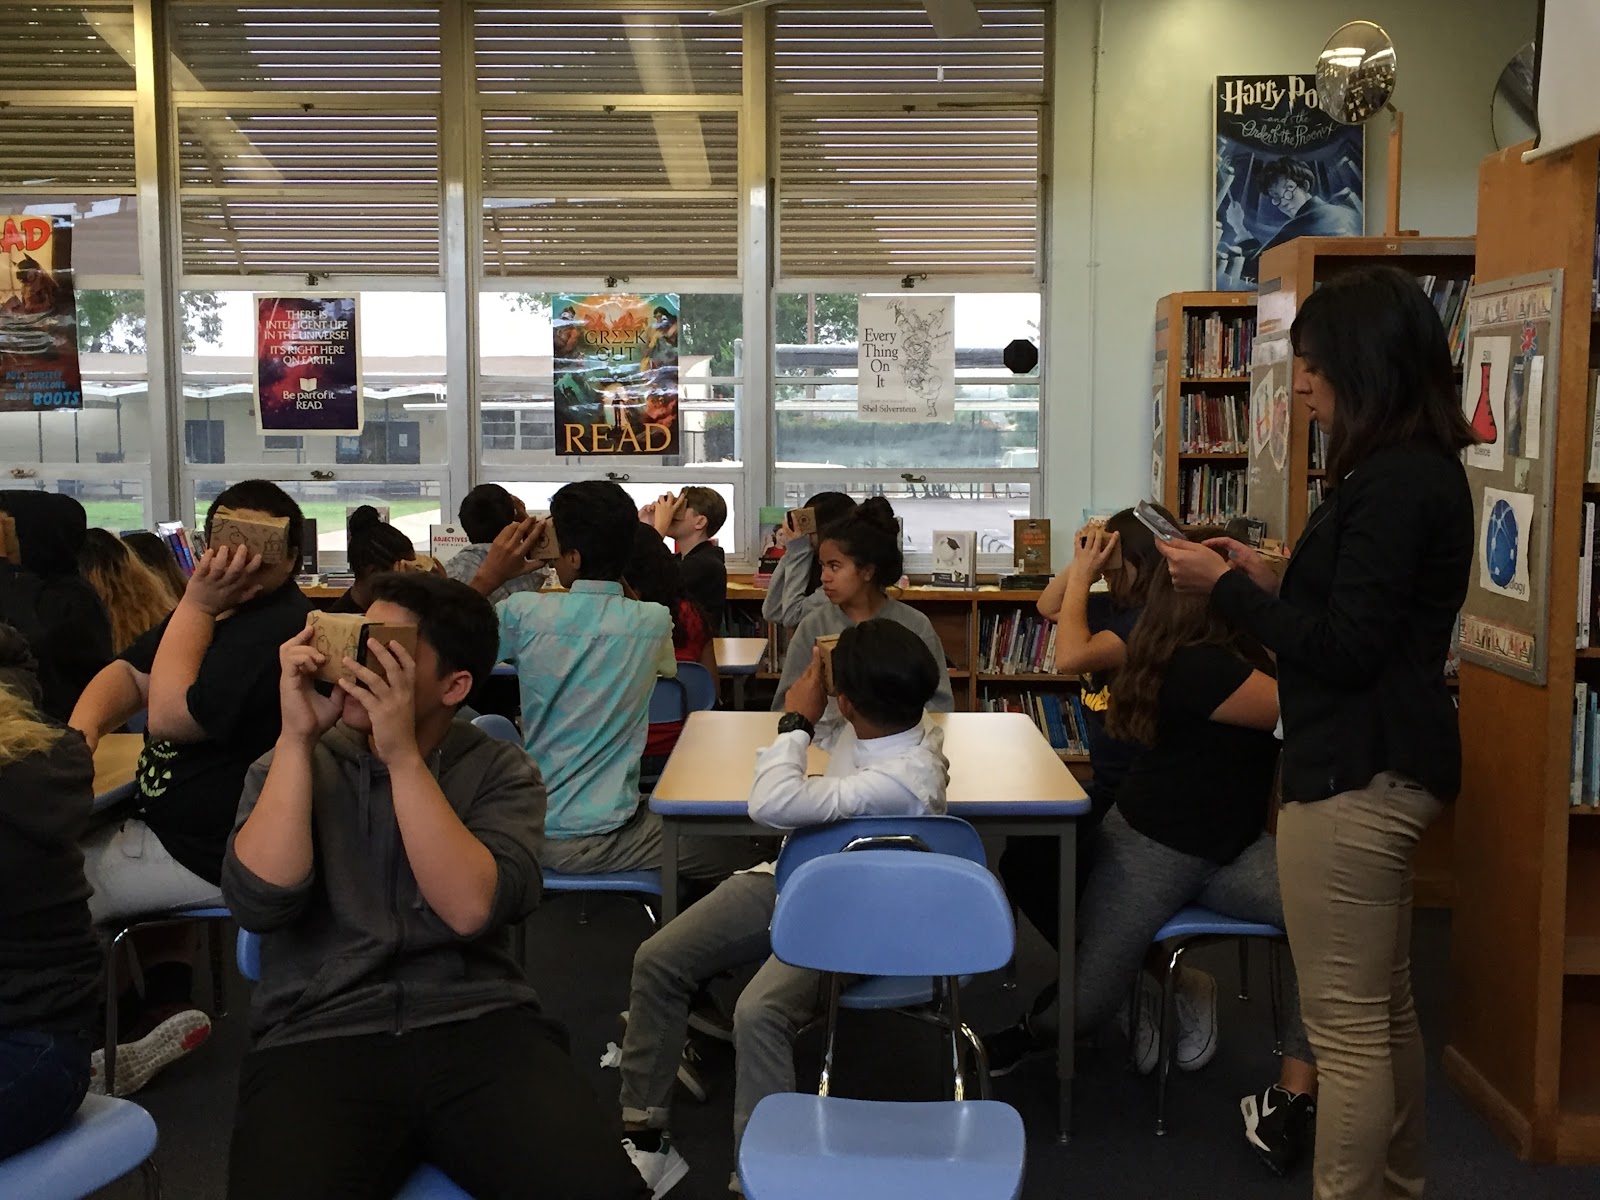
This is by far the most impact I’ve had with a single Google Form. Every day, students come to my class and complete the check-in & warm-up on their iPad. First, students answer the check-in questions on how they slept, how their breakfast/lunch was, and how their day is in general. Then, students proceed to answer the three content-based questions I have projected. The content questions are either review of what we learned the previous day(s) or prediction questions to think about prior knowledge on a topic. Sometimes I throw in fun hypothetical questions, such as “if you had one million dollars, what would you spend it on?” As a class, we discuss the content questions, but never the check-in questions.

We use the same form every day for the entire school year. I ask students to add the Form to their iPad homescreen for easy access. On my results spreadsheet, I hide the rows from the previous week to make scrolling easier.

As students come in, I am taking attendance and monitoring their check-in responses. If I use a conditional formatting gradient to turn 1’s red to 5’s green.

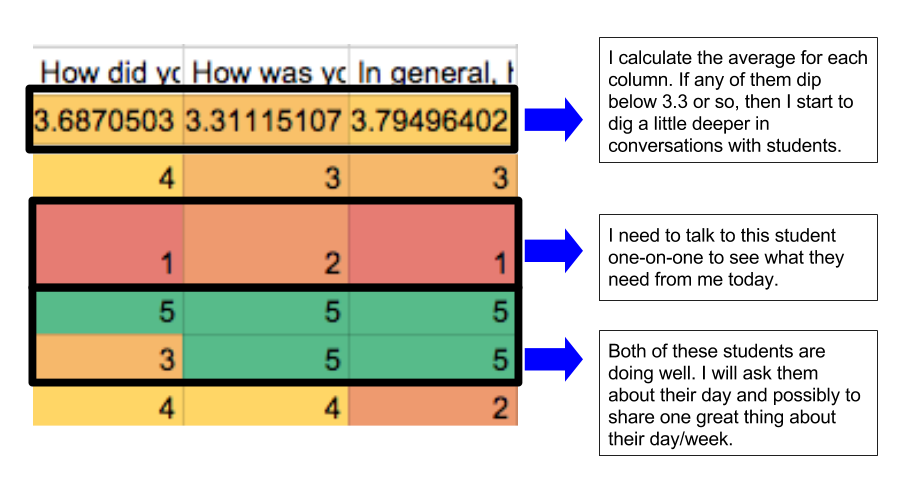
Screenshot of check-in questions with conditional formatting gradient applied.

I am admittedly jealous of my elementary teacher friends who have 20-25 students in their class and can spend more targeted time with their students. We’re on a block schedule, which means I see my science students for 100 minutes on Monday & Wednesday, and 32 minutes on Friday. It’s always tough to get around to everyone to have personal conversations.

This daily Form has changed my teaching and my relationship with my students. Many have revealed personal stresses, family tragedies, or moments of joy that they may not have otherwise shared with me. With a few students with major life stressors outside of school, I strongly believe I have been able to prevent classroom behavior challenges simply by having a conversation with the student, and letting them know I’m on their side.

Formative Assessments

With our shift toward mastery/standards-based grading, formative assessment has become even more important for both myself and my students. I often use Forms as exit tickets (forms.google.com > templates > exit ticket) and formative assessments. Now that Forms has an embedded quiz feature, I can quickly make formative assessments that show students their score and include feedback.

As I get deeper into the school year, I plan to include quick tasks or review activities for students to complete for questions they answer incorrectly. Unfortunately, the quiz feature does not yet allow for grading of short and long answer questions. A potential workaround in the meantime is to have a short/long answer question, then add in an extra column in the response sheet for teacher feedback. As I review each response, I can give students targeted feedback. When I’m done, I can use Autocrat to share students’ feedback.

If you teach multiple classes and you’re worried about students sharing out a quiz before they reach your class, create a password protected Form. It’s simple! Add a new section at the beginning of the quiz with a single short answer text question. Use data validation (3 dots, bottom right of question editing box) to set “text” and “contains” and type in your password–make sure you also fill in “custom error text” so the question doesn’t give the correct answer as feedback! This password can be quickly changed between classes for added security. (Here’s a screencast!)

Peer Evaluation

I’ve done Genius Hour with my AVID students for the past two years. Last spring, I had students present their projects to the class. During the transition time between presenters, all other students filled out the peer evaluation (make a copy); not only was this a good way for students to receive feedback, but also it cut down on the distractions during the transition. Using the RowCall add-on, I created a Sheet tab for each student presenter with their feedback, then printed a copy for each student. (Note: I would have done this digitally, but it was the last week of school when iPads were being collected, and not every student would have chosen to access their email on their own.)

Course Evaluation

At least every semester, and sometimes in the middle too, I give students a chance to give me anonymous feedback on our class. After students have completed the course evaluation (make a copy), I take some undistracted time to review the results and plan for changes. At the end of each semester, I also send a similar Form to parents to ask for their feedback. My students know I take their feedback seriously, and are candid in their responses.

Sign-in Sheet

Last week we had our Open House (also called Back to School Night). Usually, we have parents sign in on paper, which is always difficult to make sure they get passed around. Instead, this year, I set out my six Chromebooks with a digital sign-in sheet (make a copy). It saved a lot of time and energy, and I didn’t need to worry about decoding handwriting.

Other Fun Things with Google Forms

Choose your Own Adventure: Use “go to section based on answer” to create choose your own adventure stories. (Make a copy)

Self-Correcting Study Guide: Use “go to section based on answer” within study guide questions. If students answer correctly, they are taken to the next question. If student answer incorrectly, they are taken to a section with review information, such as an image, text, or a video. Once they review, they are taken to the next question. (Make a copy)

 
GSuite

Using Google Forms for Walkthrough Observations

As many of you know, I have a major obsession with Google Forms. Last school year in a Faculty Advisory Committee meeting, we were discussing our district’s walkthrough evaluation form, and how it did not adequately address our school’s focuses and goals. Once I realized I could customize a Google Form and use Autocrat to generate personalized walkthrough evaluations for teachers, I literally started bouncing in my chair. (One of my colleagues lovingly calls this “Tiggering” because I get bouncy when I’m excited!) I began a semester-long project creating the walkthrough Form, iterating on it, and troubleshooting technical problems.

I personally love it when my principal and assistant principals come through for walkthrough observations. These walkthroughs are informal, unannounced, are not put into our permanent records, and admin stays for about ten minutes to observe what is happening in my class. I can understand where there could be pushback from individuals about being observed. Building a culture around learning and framing observations as admin’s opportunity to learn from teachers can help introduce this to a reluctant teacher.

Often, our administrators sit down at an open student desk, interact with students, and ask students about what they are learning. In one very memorable walkthrough, my principal was sitting at a student desk, and I called on him to answer after a turn-and-talk (I call randomly using 2 sets of popsicle sticks–each seat has a group number and color, and I pull 1 color and 1 number stick.). He eagerly participated based on what he and his partner discussed!

Once admin leaves my classroom, I receive an email with their observations and suggestions. I always enjoy following up with them to discuss the lesson further or ask for specific support.

Here is the Google Form and the Autocrat template for the walkthrough. You’re welcome to make a copy of the Google Form (force copy) and Autocrat template (force copy), and customize for your own use!

Here’s the basic workflow of the Form walkthrough setup and implementation process:
1. Create a Google Form with the criteria you are observing. Create the Response Sheet.
2. Create a Google Doc template for Autocrat, using <> tags for each section header from the Sheet.
3. Go into the Sheet and run the Autocrat Add-on. Set it to email and/or share a copy of the doc or PDF to <> and <>
4. Take your walkthrough form into teachers’ classrooms and complete it as you are observing their lessons.
5. Once you hit submit, you and the teacher will receive an email with the observation notes!

Here’s a video on how to use Autocrat–repurposed from my Claim-Evidence-Reasoning with Google Forms blog post. Remember, if you make any changes to the Form, change the <> tags in your Autocrat doc template to make it easier to match up.

If you end up using this or something similar with your teachers, I’d love to hear about it!

This work is licensed under a Creative Commons Attribution-NonCommercial-ShareAlike 4.0 International License.

Uncategorized

Engaging Students with Google Expeditions

Last Wednesday, my school had the honor of hosting Google Expeditions for a day filled with fun. (And don’t worry, lots of learning too!) I signed up for the Expeditions Pioneer Program in March knowing that most likely they would not be doing any more visits in our area. To my surprise and excitement, they contacted me in April letting me know they’d be in San Diego in May. When I got the email, I started dancing around my classroom.

In order to coordinate the Expeditions, another teacher and I got subs so we could help teachers manage devices and troubleshoot in our two Expeditions spaces (library and cafeteria). My sub was awesome, and took pictures while I hosted my own classes. He had so much fun participating with Google Expeditions and learning along with our students.

I loved watching students who are usually disengaged asking questions and exploring. When their class’s time was up, they didn’t want to leave! A few of the teachers who brought their classes had never used Google Cardboard before, and had similar reactions to the students–awe and wonder. I loved sharing this experience with my school, and I’m thankful for Cristianna from the Google Expeditions team, my fellow teachers, my supportive admin, and for our students for making this incredible day happen.

Below is my writeup that I submitted to my district’s newsletter: 

—-

MV Expeditions 1.JPG
My 3rd period science class checking out
active volcanoes from around the world!

On Wednesday May 18, 2016, Mar Vista Academy welcomed the Google Expeditions team for a day filled with virtual reality adventures and excitement. “Expeditions are guided tours of places schools buses can’t go. They are comprised of virtual reality panoramas and are led by a guide or teacher. Using a tablet, teachers can guide up to 50 students wearing virtual reality viewers. Teachers can guide their class and point out highlights while referring to editable notes” (www.google.com/edu/expeditions).


IMG_6814.JPG
Students turning to look at a feature pointed out
by their teacher.
The technology is simple. Each student has a Google Cardboard with a smartphone enclosed. The smartphones are connected to the teacher tablet via wifi. The teacher selects the expedition from a list of over two hundred locations around the world, and sends out a 360° image to the student device. Students are able to independently explore this image simply by turning their head, looking up, and looking down. The teacher platform comes with notes about the location, people, and organisms at the location, making it easy for a teacher to guide an Expedition with little to no background knowledge.


IMG_6842.JPG
AVID Excel students on their Expedition
Throughout the day, twelve teachers and over three hundred students participated in the Expeditions. Students visited the rainforest, observed ocean life, traveled to the moon, and explored historical sites, without ever leaving school.


Students had a blast visiting new places and learning as they explored. Seventh grader Andrew says, “It can help me see things that would be impossible to look at in schools and I will be able to understand things better since I am a tactile learner.” Our students enjoyed their new learning, and even students who do not typically enjoy school found themselves highly engaged. Seventh grader Vanessa reports that she “learned about the research they are doing to bring back some extinct species.” Our seventh graders studied about human impact on ecosystems and endangered species this semester in science. Eighth grader Jamie reports “My favorite part of the Google Expeditions experience was being inside a picture and always having something to look at, no matter which side you turn. I mostly enjoyed seeing animals in their natural habitat.” Not only were there many science-related expeditions, but also our students were able to view historic battlefields, such as Gettysburg or analyze the geometry in the architecture of Burj Khalifa, the tallest building in the world.
IMG_6704.JPG
Mr. Williams taking his 7th grade math class
to the Great Barrier Reef.


IMG_6707.JPG
Ms. Johal exploring the surface of the moon with her
8th grade science students
Additionally, our Mar Vista Academy teachers were wowed by the experience. Our teachers were just as engaged as our students. Mr. Williams enjoyed taking his seventh grade math students, and perfectly sums up the experience. “The Google Expeditions activity was a great hook for my class and a fun way to get students thinking about the world around them. We toured the Great Barrier Reef for the purpose of analyzing percents. An actual trip for this simple purpose would have obviously been cost prohibitive. Letting students explore on their own generated great excitement and conversation and then being able to guide students to a portion of each picture to view allowed me to teach at the same time. The reflection and sharing after we put the google devices away was surprising. Student that are sometimes afraid to share their work or justify their answers in math were eager to share what they thought and liked about the expedition. I noticed more participating from those students during class immediately following the Google Expedition.” Each and every teacher that participated had similar thoughts about their experiences.


Students and teachers have been asking if and when Google Expeditions will come back to Mar Vista Academy. Everyone had a great time, and we exploring the world together.


Thank you, Google Expeditions!